
If you’ve been studying classical guitar for even a short time, you’ve heard these two terms:
- Free stroke (tirando)
- Rest stroke (apoyando)
They’re both fundamental, and they’re not competing techniques—you’ll use both to shape tone, volume, and musical emphasis. The real win is knowing when to choose each stroke so your playing sounds clean, controlled, and expressive.
Jump to Section:
- What is Free Stroke (Tirando)
- What is Rest Stroke (Apoyando)
- Guitar Rest Stroke Technique: How It Works
- Flamenco and Classical Guitar Thumb Rest Stroke
- How to Practice Rest Stroke
What is Free Stroke (Tirando)?
Free stroke guitar (tirando) is the most common right-hand plucking motion in classical guitar.
In a free stroke, your finger plucks the string and then moves freely into the air—it does not come to rest on a neighboring string.
In the Guitar Foundations materials, this is described as a natural, fluid stroke used for arpeggios, chords, and relaxed passages—and it’s the technique you’ll use roughly 80% of the time.
Why free stroke is your default
Free stroke is ideal when you need multiple strings to ring together—because it doesn’t “bump into” adjacent strings and stop them from vibrating. That’s why it’s essential for:
- Arpeggios
- Broken chords
- Chord melodies with sustained harmony
- Most general fingerstyle textures
In other words: if you want the guitar to feel open, resonant, and free-flowing, tirando is usually the move.
What is Rest Stroke (Apoyando)?
Rest stroke classical guitar players often call this by its Spanish name: Apoyando.
In rest stroke, after your finger plucks a string, it follows through and lands on the adjacent string.
Ultimately, it’s a more forceful and helpful for creating a bigger, rounder sound. The technique is especially appropriate for melodies, scales, and single-note lines.
Why rest stroke sounds bigger
Rest stroke naturally adds:
- More projection
- More “core” to the note
- A clearer, more defined attack (without needing to over-pluck)
That’s why it’s so effective when you want a note to stand out—like a melody note sitting above an accompaniment.
Guitar Rest Stroke Technique (How it Works)
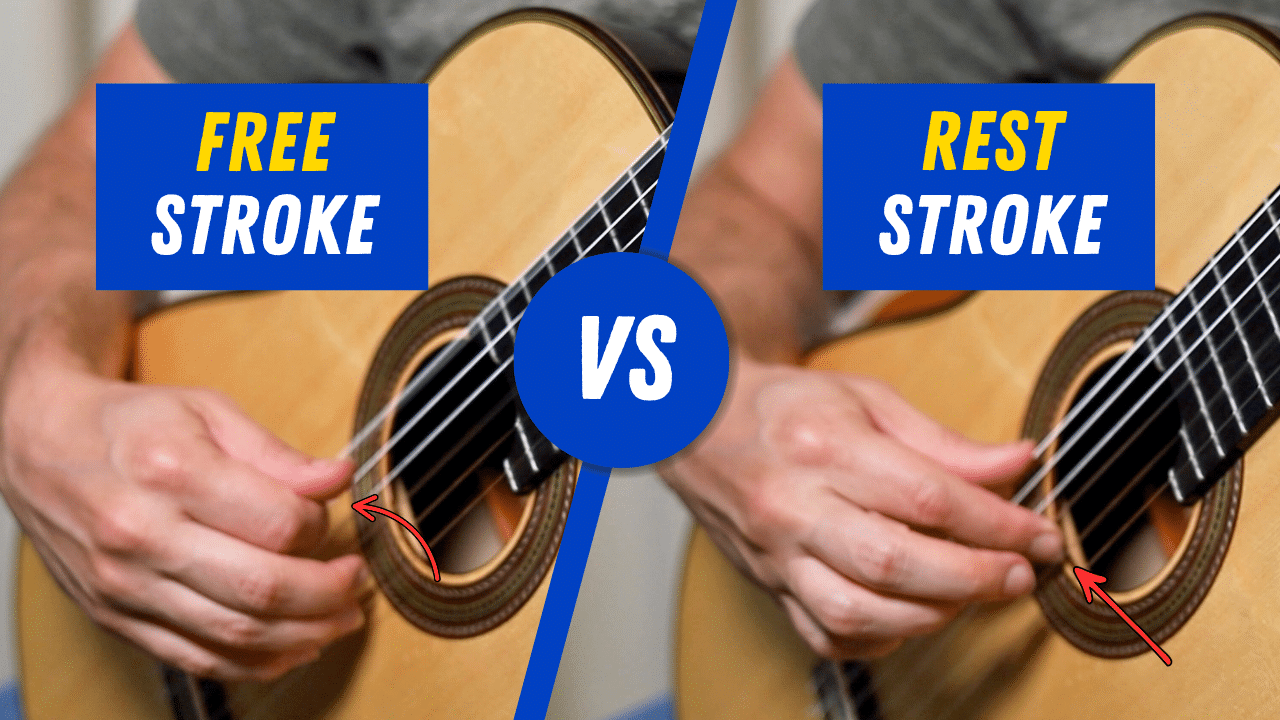
Both free stroke and rest stroke use follow-through. The key difference is the direction of force and where the finger ends up.
Free stroke moves through the string and into the air. Rest stroke moves through the string and into the next string. That small difference changes the tone completely.
When to Use Free Stroke vs Rest Stroke
Here’s the simplest rule that keeps you out of trouble:
Use Free Stroke for “Many Strings Ringing”
- Arpeggios (always)
- Chords (most of the time)
- Accompaniment patterns where you need sustain and blend
Use Rest Stroke for “One Note Needs to Lead”
- Scales
- Single-line melody
- Accented notes that need to pop out
- Any moment you want a more “professional” clarity and projection (especially in lyrical passages)
And yes—good players routinely mix both inside the same phrase: rest stroke for melody notes, free stroke for the supportive texture underneath.
Free Stroke Vs Rest Stroke Demo
Hear the difference in 25 seconds.
Rest stroke gives you that clear, professional tone for scales and melodies. Free stroke is your default, but rest stroke is your secret weapon.
Guitar Rest Stroke Symbol (How It Appears in Sheet Music)
This is a common point of confusion.
There isn’t one single universal “guitar rest stroke symbol” that shows up in every edition the same way. Depending on the publisher/editor, you might see:
- The word “apoy.” (short for apoyando)
- The word “tir.” (short for tirando)
- Text instructions like “rest stroke” / “free stroke”
- Occasionally editorial markings placed above the staff to indicate tone/attack choices
- Composer Julio Sagreras in one notable composer who indicates when apoyando should be used in his Method books using the ^ symbol:
When in doubt, use the musical logic:
- If it’s a melody line that needs to project → try Apoyando
- If it’s a texture (arpeggio/chord) that needs sustain → use tirando
Flamenco and Classical Guitar Thumb Rest Stroke
Most students think of apoyando as an i–m (index/middle) thing, but thumb rest stroke is absolutely a real (and very useful) tool.
When you use thumb rest stroke, the thumb plucks a bass string and then rests on the next bass string. This can give the bass line more weight and can help with clarity in bass melodies or accented bass movement.
A practical way to explore it:
- Try a simple bass line (like E–F–G–F–E on the 6th string area)
- Play it once with free stroke thumb
- Then try rest stroke thumb, allowing the thumb to land on the adjacent string after each note
You’ll usually hear the bass become more present without you feeling like you have to “muscle” the string.
Thumb Rest Stroke
Your thumb lands on the string below = bigger attack, cleaner legato, more control on bass lines.
Classical players: this works for melodic passages too (not just flamenco).
How to Practice Rest Stroke (Simple, Effective Routine)
The Guitar Foundations approach is straightforward: start with a basic arpeggio for free stroke, and a scale for rest stroke—then compare and combine.
- Rest stroke: C major scale
- Play a C major scale using i–m alternation
- After each note, let the finger land on the adjacent string
- Listen for a rounder sound and a cleaner “front” of the note
- Compare: same passage, different strokes
- Play the same scale twice:
- Once with free stroke
- Once with rest stroke
- Notice the feel difference and the sound difference.
- Play the same scale twice:
- Combine in real music phrases
- Use:
- Rest stroke for strong melody notes
- Free stroke for accompanying arpeggios
- This is one of the fastest ways to create a more “arranged” sound, even in simple pieces.
- Use:
Blending Rest Stroke with Free Stroke
This example or Francisco Tárrega’s “Adelita” shows how you can COMBINE guitar rest stroke with free stroke in a real life scenario.
In this opening phrase, you can use rest stroke for the melody, free stroke for the accompaniment).